Our New Studio

After we received the news that the venue we hold our Sewing Classes in Leeds had been sold and we could no longer hold them there, we searched high and low for a suitable place. It was a long search and nothing seemed quite right, or was right… but at the wrong price! What I really wanted was my own place, somewhere I wouldn’t have to rely on anyone else, somewhere I didn’t have to travel to… and that is when the idea of the Sewing Studio was born!

Studio Landscape

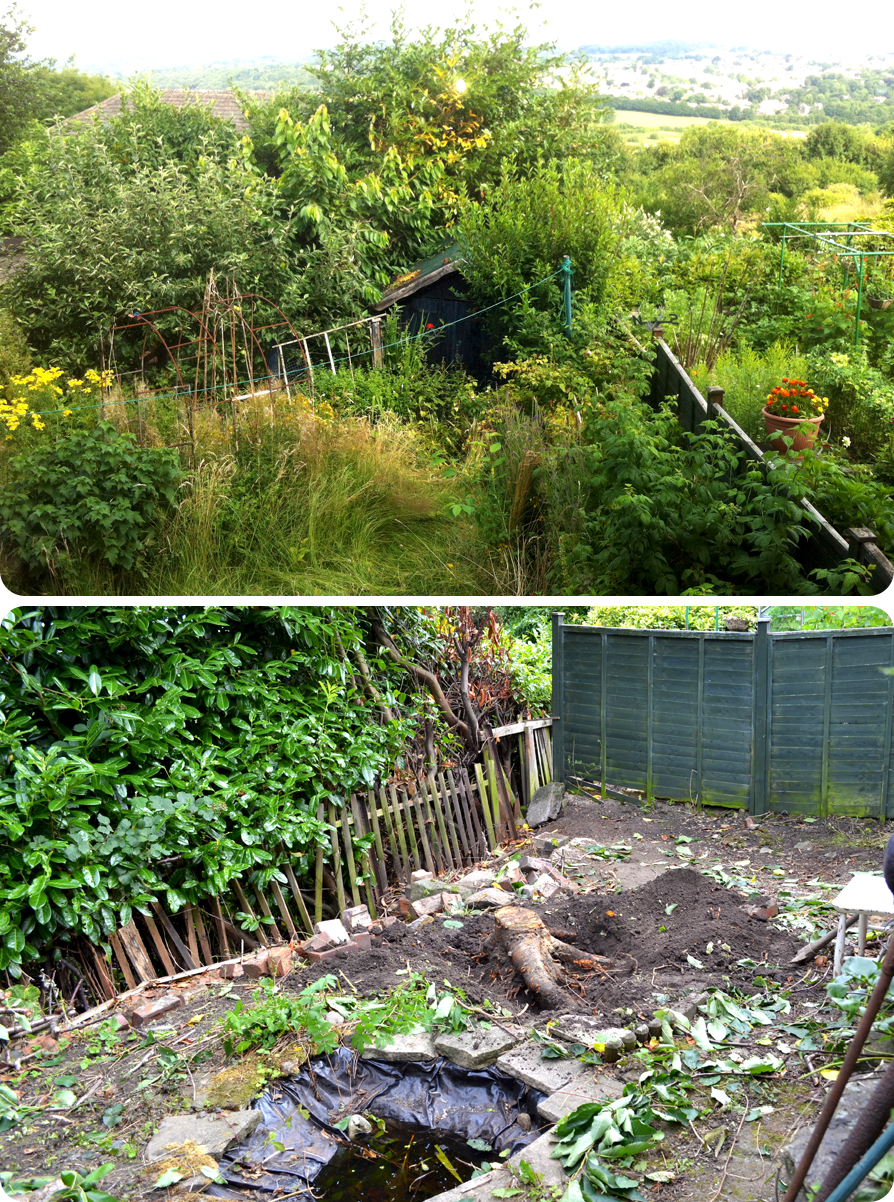
We recently moved house to a lovely 1930’s semi-detached house on Rock Lane in Leeds, and although there is a lot of work to be done, I just knew it would be the perfect home for us. At the bottom of the sloped garden was a step down, about 22 foot wide and 10 feet deep. This would be the perfect place to have a studio to hold my classes in. Yes, there was a pond and a massive cherry tree to remove… but hey, I have a husband for that!

Overgrown garden Pond etc

The biggest difficulty was digging the trench for the electrics to run from the house to the garden… 2 feet down and thick clay soil with lots of rockery. Mitchell attacked it with a pick-axe and after a run in with the washing line, it was off to A&E… ouch!

Pick Axe

After clearing the jungle that was the garden (the house had been stood empty for a while, after its hoarding owners had vacated!) it was time to lay the base. 2 tons of hardcore wheel-barrowed down the garden and what seemed like a mountain of concrete later and the Studio had somewhere to sit.

Then on the magically day when the studio is delivered and it is to be erected in all its glory… the skies opened, but hey, we’re british!… We don’t let a bit of water get in our way, oh and did I mention, we are due to have classes in here in a week!?

9 Pictures

And whilst the men worked hard… Mum provided lunch and tea-a-plenty!

Once the studio was up it time for the technical bits… electricity and lights. Then… my favourite part of all… making it pretty!

Inside the Studio Photos

I cannot thank my Dad and my Husband enough for all the hard work they put into making my dream come true. We have now held 2 classes in the new studio and it seems people love it. A few more decorations needed to brighten it up, but I guess that comes with time.

Inside the Studio

It just goes to show that if you have a vision, and a Husband and Dad with a bit of muscle, you can achieve your dreams.

the perfect setting

We look forward to sewing with you in our new Studio soon x

(…remember… it’s not a shed!)

Pressing Flowers

If you have received some flowers today and like me love them when they are in bloom but wish they would stay that way forever… pressing flowers is for you. Its a true vintage hobby, with pressed flowers found in antique books… and it can become addictive.

Remember, its only good to press flowers which are in full bloom, but sacrificing a few heads from a bouquet is worth it.

Flower Pressing 2


Snip the head off one of your flowers. Open a heavy book and cover the pages with some blotting paper or kitchen roll and place the flower head inside the book. You can add some leaves in too if you like.Flower Pressing 6 Flower Pressing 4Flower Pressing 5

Close the book and rest more heavy books on top. Leave it for about 4 weeks or more and then your flower will be pressed.

All we need to do now is wait 4 weeks to find great ways to use pressed flowers…

Green Fingers… Sowing not Sewing

Now its February this is the time when I start to think about spring coming and getting ready to work towards my dream of growing my own vegetables. Its been about 2 years since I have been interested in growing my own, but they haven’t been 2 years of successful growing… that’s for sure. I tend to always have 1 really successful crop and the rest I either forget about or have sown too late to get good fruit. So this year I am sowing early… although its not really early, its on time for most gardeners but early for me! This year I am determined to be a success…

Green Fingers Title

I have started by sowing Tomato, Sweet Pepper and Chilli…

Empty Tray


I have decided to sow more seeds than I require, for the chilli plants I thought that even if I have too many I can always give them to people as gifts.

I have also sown several varieties of tomato, I love the look of a salad with yellow and red tomatoes in, so I have decided to grow both.

Fill with soilWater


To get the seeds to germinate I have popped them in the airing cupboard as it can be a bit cold on the window sill, but as soon as they are starting to grow through the soil I will put them on the window sill.


Pop on the window sill


I have also started chitting my potatoes. I have never grown potatoes before but have read a few blogs and some really good books and they advise chitting for 6 weeks before planting them so here goes…

Chitting PotatoesChitting Potatoes sill


Wish me luck with my veggies… and I will let you know how I get on x

Chinese New Year… Invitations

February 9th sees us entering the year of the snake in the Chinese calendar. I have never celebrated Chinese new year but this year I have decided to go all out. I will be inviting friends round for a meal with some festive touches to make it special.

It all starts with an invitation…

Chinese New Year Invitations

Now… I know what you’re thinking… isn’t an origami crane Japanese? Well yes, you are right but they look so cool and unique I couldn’t resist.

I got some origami paper packs on ebay and looked up this tutorial and folded away.

Origami Crane

Using some clear jewellery thread I threaded through the crane’s back, tying a knot at the bottom and top so the crane doesn’t slip down the line.

I used a parcel tag at the bottom as the invitation card and tried my hand at writing ‘New Year’ in Chinese to add a festive touch.

Origami Invitation with Tag

The perfect invitation people can hang in their window and get excited about the  party to come.

Final

Borough Market, London

A few weekends ago I was invited to London to a civil partnership of my Brother-in-Law and took the opportunity to take a peek at Borough Market. I was so pleased I did. If you ever get the chance head down at lunch-time and eat your way round!…

Where you are

Everywhere I turned there was something to indulge my senses, a new flavour to indulge in… and I did…

PretzelsOlives

GameIt was great to see old fashioned techniques still being used today and sellers passionate about their trade, the atmosphere was amazing. Just when I thought I had soaked in as much as I could, a splash of vibrant colour lifted me to another level… and we sipped on Prosecco and soaked it all in!

Marias Market

Prosecco

Good food, good drink and good company… just the ingredients I need.

Thank you for visiting

Make your own Ingredients… Fish & Chips

You would be forgiven for thinking Fish & Chips is a classic UK meal for by the seaside, well you are right but not just for the UK… Its one of New Zealand and South Africa’s favourite and most popular dishes.  When I was growing up you could easily feed a family of 4 for 2 quid!… here’s the Our Munch version for you to bring it up to date…


You will need;

  • Pieces of white fish (any white fish will do so pick your fave)
  • 250g Plain Flour
  • Baking powder – 1/2 tsp
  • 300ml Beer – a golden beer is best
  • Water (just incase its too thick!)
  • Paprika – Just a pinch
  • Oil for frying
  • Salt, Pepper & a wedge of lemon for seasoning
  • Potatoes for chips – 1 per person (Maris Piper or Desiree are best)


Whisk together the flour, beer, paprika, baking powder and beer together in a bowl until smooth and lump free! Add some water if too thick.

Leave to rest in the fridge for 1/2 an hour

Preheat the oven to 80 degrees

Now its time to make those chips… Cut into thick wedges and pop them straight into a pan of salted cold water. Don’t be tempted to rush the process by banging them straight in boiling water – if you raise the temperature of the water to boiling, with the potatoes in they will cook evenly and will give your chips the best flavour. You don’t want potatoes which are mushy on the outside and raw in the middle!


Leave to simmer for 10-15 mins, until the outside is softened but the shape still holds. Strain & pat dry with kitchen roll.

Get the oil hot in a pan… (ideally 175 degrees) Fry the chips for 3-4mins and strain on kitchen towel. Pop in the oven to keep warm whilst you make your fish.

Top Tip: If you drop a piece of corn in your oil whilst it heats… when the corn pops into popcorn your oil is ready!

Put some flour in one bowl and your homemade beer batter in another.


Coat your fish in flour and then dip in the batter. Hold the fish by one end and sink into the hot oil (keeping hold of the tail) swim the fish around in the oil for a few seconds. This makes a seal in the batter and stops your fish sticking to the bottom.


Cooking your fish usually takes about 10mins depending on the size. You will be able to tell when it is cooked as the fish will turn a golden brown, flip over to the other side half way through. Serve with a wedge of lemon and some tartar sauce (recipe for sauces coming up later!)

Serve in newspaper for the authentic look!

We’d love to know what you think of our ‘Make your own ingredients’ series with Our Munch… so please leave a comment…

Make Fruit Candles

If you’ve never heard of Alfresco Dining then you are in for a treat! Imagine a beautiful woodland, beach or lakeside area transformed for a few hours to host a private dinner party…

this is what we created when we were asked to get involved with Margaurita Photography and Our Munch for an Alfresco Dining photoshoot.

With Natasha from Margaurita Photography on her holidays at the moment we are guest blogging for her whilst she laps up the sun in San Francisco… Jealous?… Definitely!

And well… you wouldn’t know we were involved without a touch of DIY to add the finishing touches…

Here’s how we made candles from Oranges…

1. Cut your oranges or (any fruit you wish to use) in half and scoop out all the flesh from the inside.
2. tie a small piece of string (for a wick) to a stick and rest so the string hangs down
3. Pour melted wax into the fruit halves and leave to set
You can get wax beads from any good craft centre, I just poured the wax into an old pan over a low heat.
You can use any fruit you like, and it gives a great scent to the room… We think this would look great on a Christmas or Thanks Giving table too.
Keep an eye on Margaurita Photography’s Blog for the full pictures from the shoot.


Make Your Own Ingredients… Pesto

This is Pesto Our Munch style so of course it has a bit of a twist… They call it Semi-Dried Tomato Pesto… and don’t think you are buying your dried tomatoes, no… you will make your own ingredients of course!

It all starts with a tray of tomatoes, drizzle with olive oil and icing sugar and salt to bring the moisture out. Sprinkle them with some fresh thyme or rosemary and stick them in the oven.

and voila… Semi Dried Tomatoes! The longer you leave them the drier they are. We put ours in a 90 degree oven for 6 hours. You can put them in an oil filled jar and keep them until later

For the Pesto…

  • 6 tomatoes – oven dried
  • 50g walnuts
  • 100g parmesan
  • Juice of half a lemon
  • 1 crushed garlic clove
  • Few basil leaves
  • Olive oil – the best you can afford
  • Salt & Pepper

Smash the walnuts in a pestle & mortar, chop the tomatoes, grate the parmesan and mix with all the other ingredients.

Add oil until you get a consistency you like. Use sugar, salt, pepper and lemon juice as seasoning and taste over and over. Too sharp? Add sugar. Too rounded? add lemon juice. Too bland? Add salt.

Mix it all together and add some chopped basil if you like. We mixed the old fashioned way… with a spoon cos we like the crunchy textures.

Eat with Gnocci, Pasta, Chicken… or even give as a gift!

Make a Button Peg…

The perfect accessory for your padded noteboard and great way to peg your notes to your board with a pretty twist…

Step 1. Drill a hole in a peg. If you don’t have a drill then bore a hole with a sharp point.  Step 2. Cover a button with your chosen fabric.  Step 3. Paint your peg and push the button stem through the hole in the peg.  Add some glue if needed.  Step four. Admire your pretty peg x